OpenWrt磁盘扩容
2023-06-25
OpenWrt磁盘扩容
搬运 eSir大神的 openwrt系统下/overlay分区扩容方法https://www.bilibili.com/read/cv17550351/
转自:https://www.youtube.com/watch?v=YwbwzuXKNlg
展开目录
OpenWrt空闲磁盘空间扩容、添加硬盘扩容
https://zhuanlan.zhihu.com/p/597500496
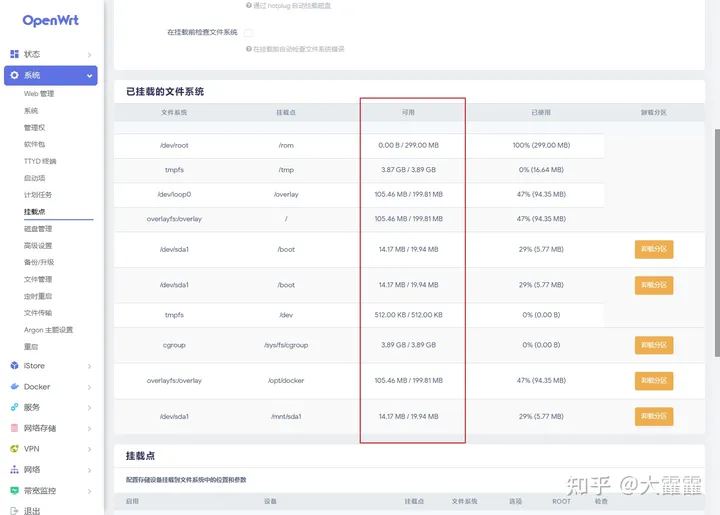
一般大佬们的固件都不会给我们留下太大的空闲磁盘空间,不利于我们瞎搞,但Docker吃硬件,内存增加很简单,磁盘空间不足要增加会稍微麻烦一些。查看剩余空间:
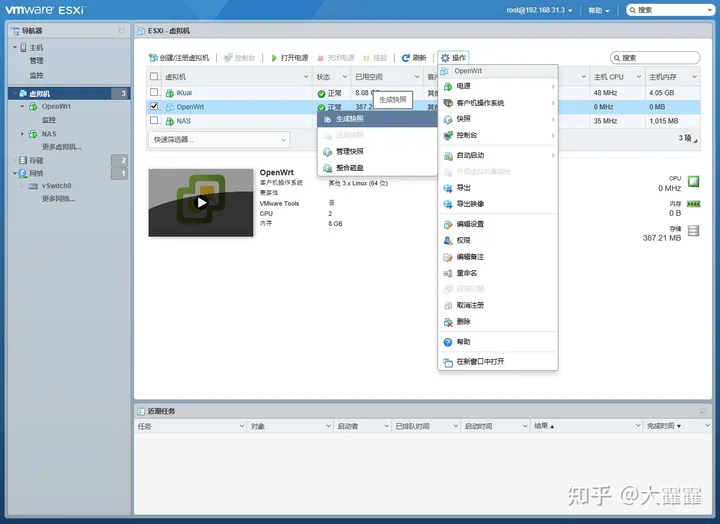
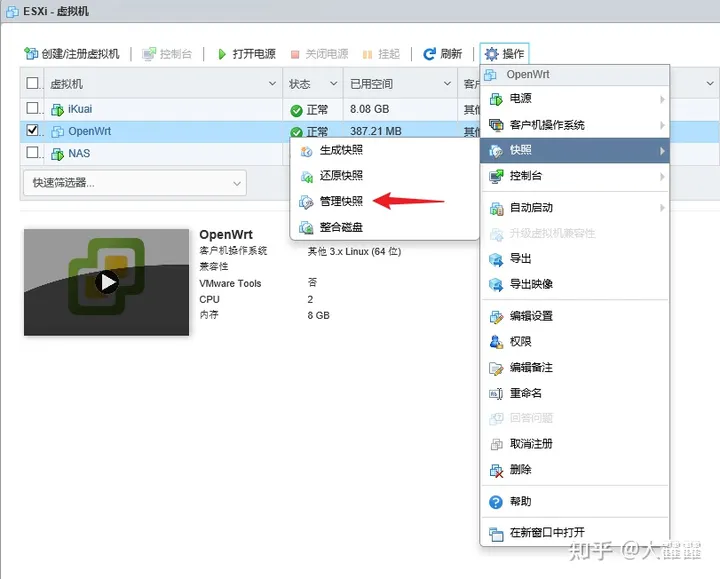
折腾之前最好把虚拟机做个快照,省的搞砸了还得重新安装OpenWrt。先关机,调整硬盘空间,然后做快照
OpenWrt login: root
Password:


BusyBox v1.35.0 (2022-12-08 06:20:57 UTC) built-in shell (ash)

  _______                     ________        __      __     __
 |       |.-----.-----.-----.|  |  |  |.----.|  |_   |  |   |__|
 |   -   ||  _  |  -__|     ||  |  |  ||   _||   _|  |  |__ |  |
 |_______||   __|_____|__|__||________||__|  |____|  |_____||__|
          |__| W I R E L E S S   F R E E D O M
 -----------------------------------------------------------------
 OpenWrt SNAPSHOT, r5522-5a8163e07
 -----------------------------------------------------------------
 root@OpenWrt:~# poweroff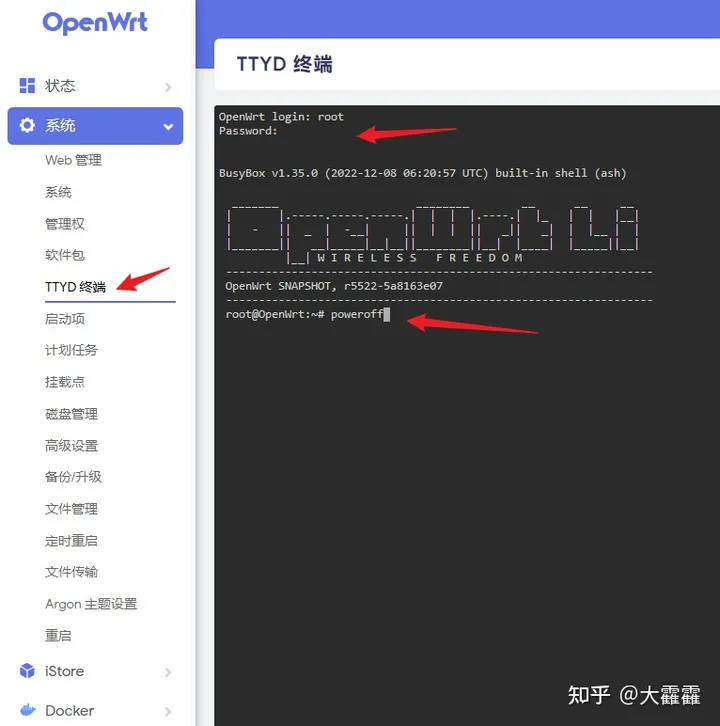
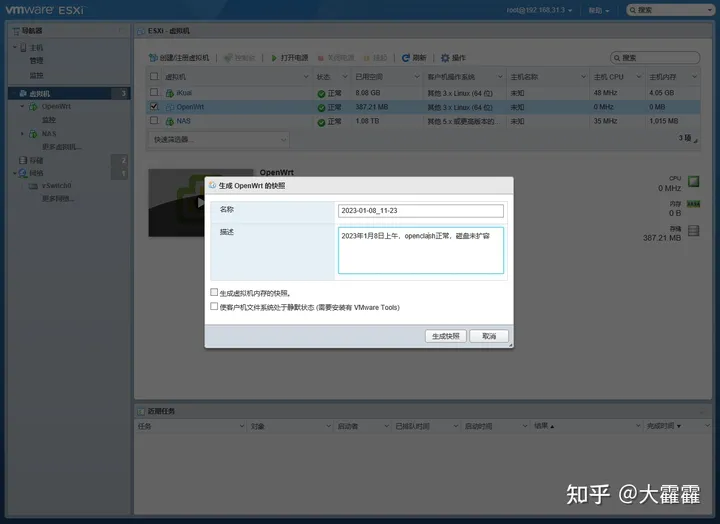
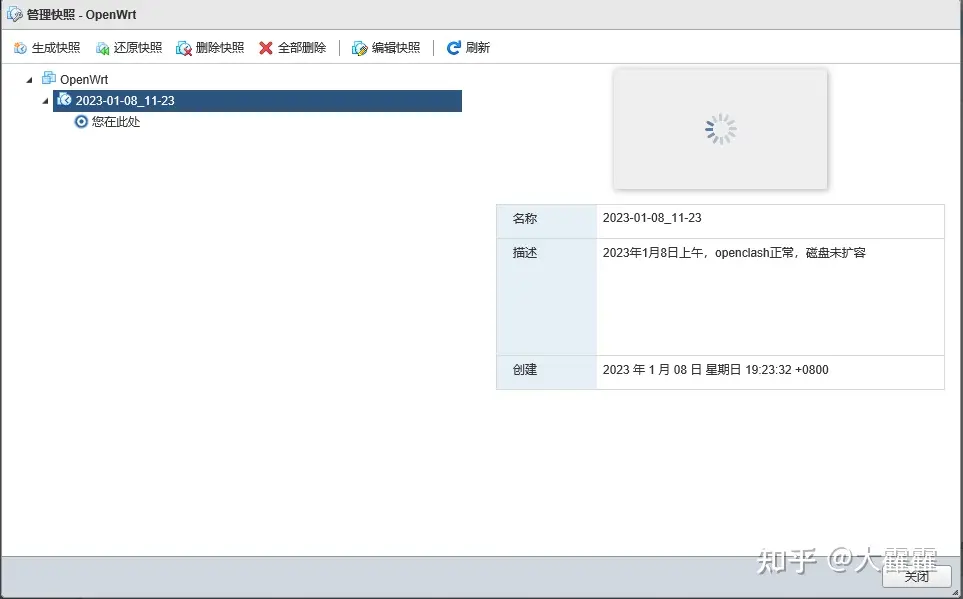
点击管理快照,检查刚才的快照是否成功了
打开虚拟机电源,启动后查看磁盘空间情况
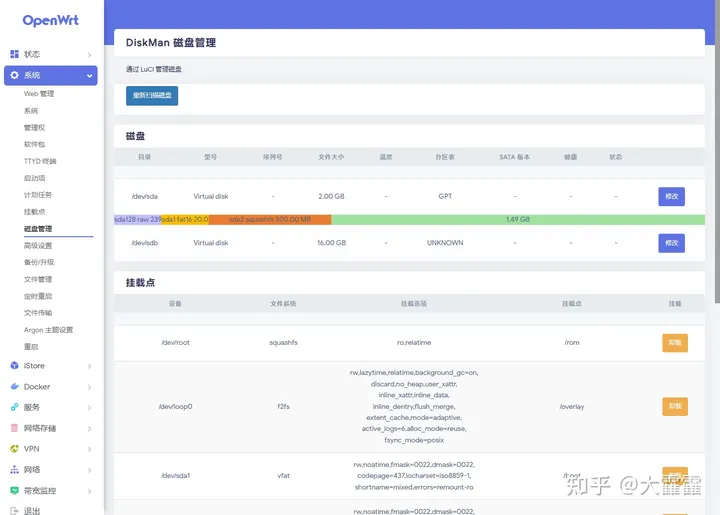
原来的几百兆固件空间我修改为2G,然后新增加了一块16G虚拟硬盘,先修改2G的,绿色的空闲空间分给根目录
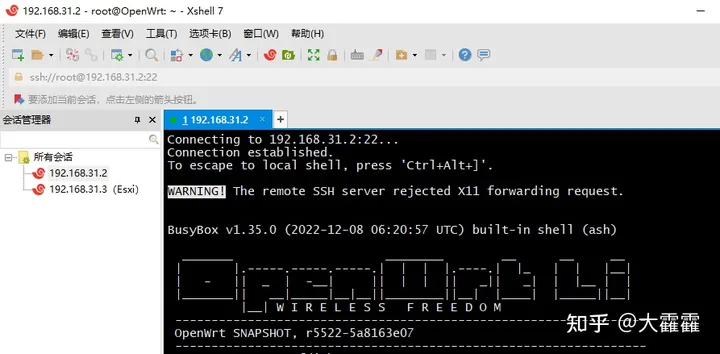
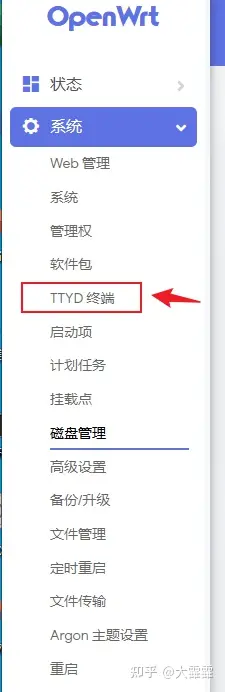
利用ssh软件登录到cli界面(或者使用网页TTYD终端)
方式一:软件登录(xshell或putty或SecureCRT)
方式二:网页自带TTYD终端
使用cfdisk命令,把空闲的空间创建为新分区,并格式化为EXT4
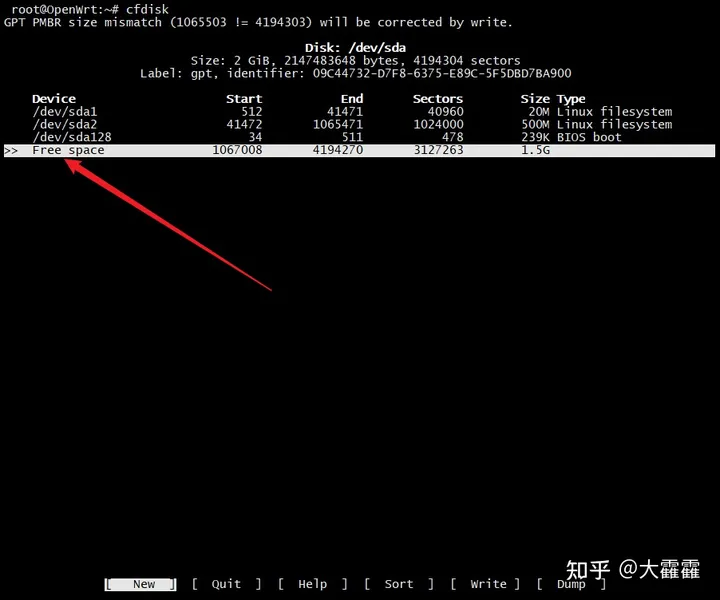
光标移动到“Free space”,选中空闲空间,然后选择下面的“New"新建分区,回车
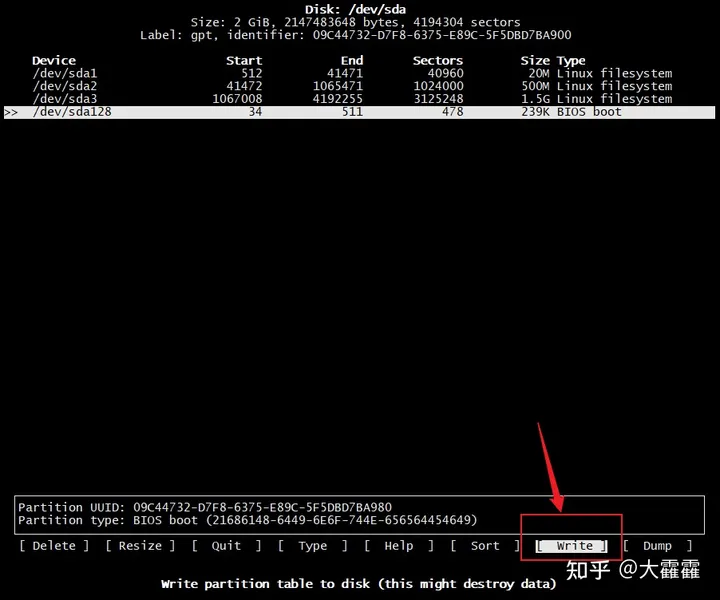
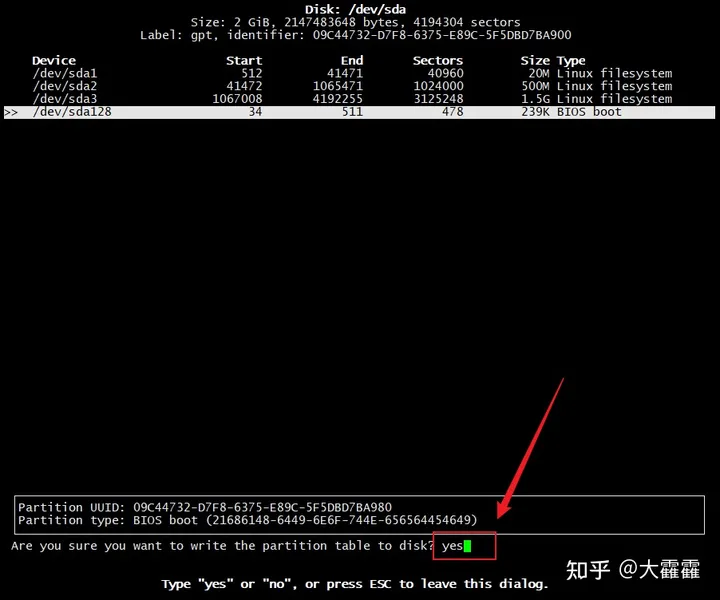
“Write”写入分区,然后输入“yes"回车,“Quit"退出

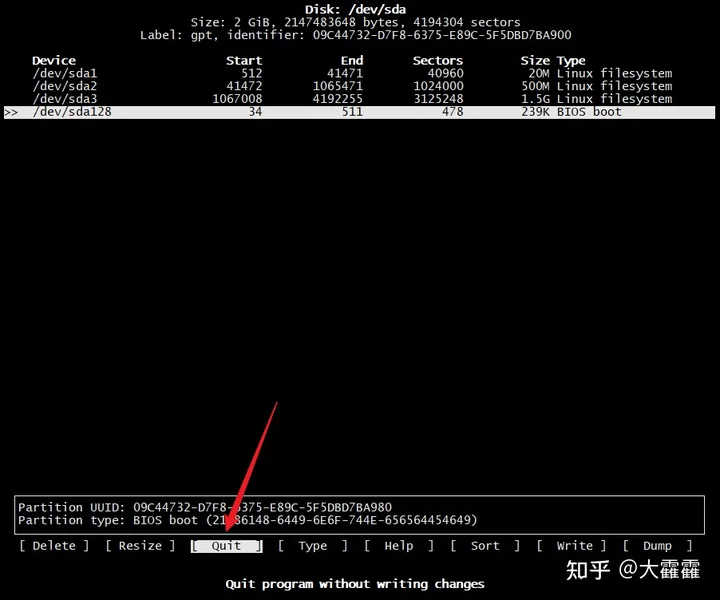
"fdisk -l"或者"lsblk"查看分区是否创建
root@OpenWrt:~# fdisk -l
-ash: fdisk: not found
root@OpenWrt:~# lsblk
NAME     MAJ:MIN RM   SIZE RO TYPE MOUNTPOINTS
loop0      7:0    0 201.8M  0 loop /overlay
sda        8:0    0     2G  0 disk
├─sda1     8:1    0    20M  0 part /mnt/sda1
│                                  /boot
│                                  /boot
├─sda2     8:2    0   500M  0 part /rom
├─sda3     8:3    0   1.5G  0 part
└─sda128 259:0    0   239K  0 part
sdb        8:16   0    16G  0 disk
nbd0      43:0    0     0B  0 disk
nbd1      43:32   0     0B  0 disk
nbd2      43:64   0     0B  0 disk
nbd3      43:96   0     0B  0 disk
nbd4      43:128  0     0B  0 disk
nbd5      43:160  0     0B  0 disk
nbd6      43:192  0     0B  0 disk
nbd7      43:224  0     0B  0 disk
nbd8      43:256  0     0B  0 disk
nbd9      43:288  0     0B  0 disk
nbd10     43:320  0     0B  0 disk
nbd11     43:352  0     0B  0 disk
nbd12     43:384  0     0B  0 disk
nbd13     43:416  0     0B  0 disk
nbd14     43:448  0     0B  0 disk
nbd15     43:480  0     0B  0 disk
root@OpenWrt:~#
创建后,格式化为ext4(我刚才新建的分区的是/dev/sda3)
root@OpenWrt:~# mkfs.ext4 /dev/sda3
mke2fs 1.46.5 (30-Dec-2021)Discarding device blocks: done Creating filesystem with 390656 4k blocks and 97728 inodes
Filesystem UUID: 34110c0a-d83e-43ba-bf54-53401e689c84
Superblock backups stored on blocks:
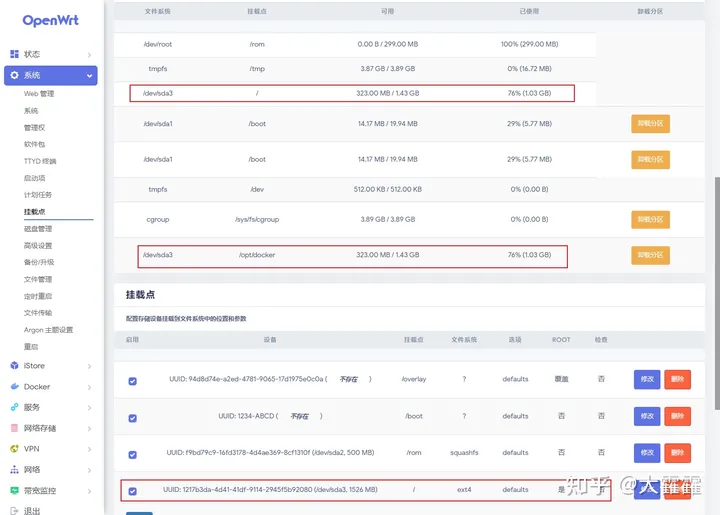
32768, 98304, 163840, 229376, 294912Allocating group tables: done Writing inode tables: done Creating journal (8192 blocks): doneWriting superblocks and filesystem accounting information: done root@OpenWrt:~#然后进入OpenWrt网页,在挂载点那里生成配置
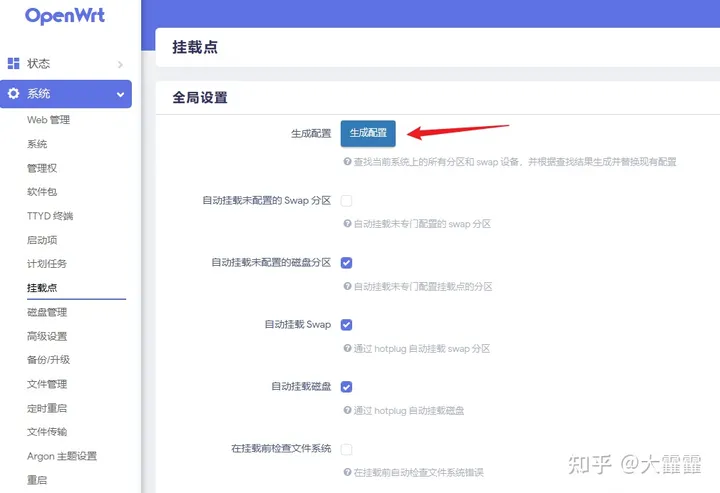
然后就可以在下面的”挂载点“看到刚才的sda3了,点击修改
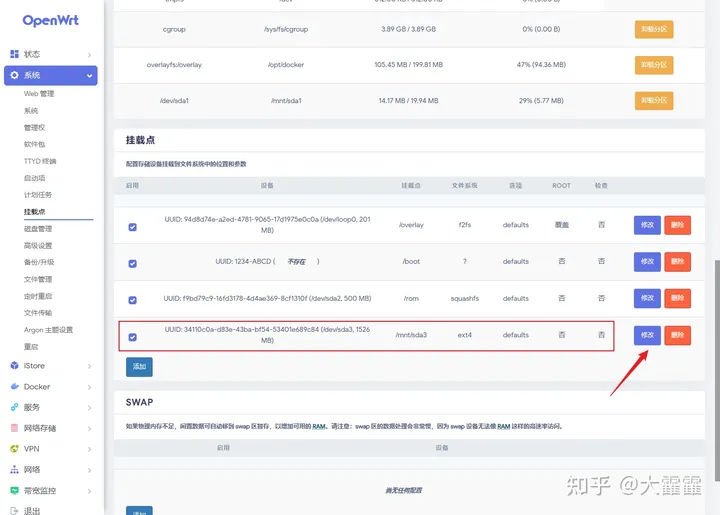
启用此挂载点,根据UUID,作为根文件系统,保存应用
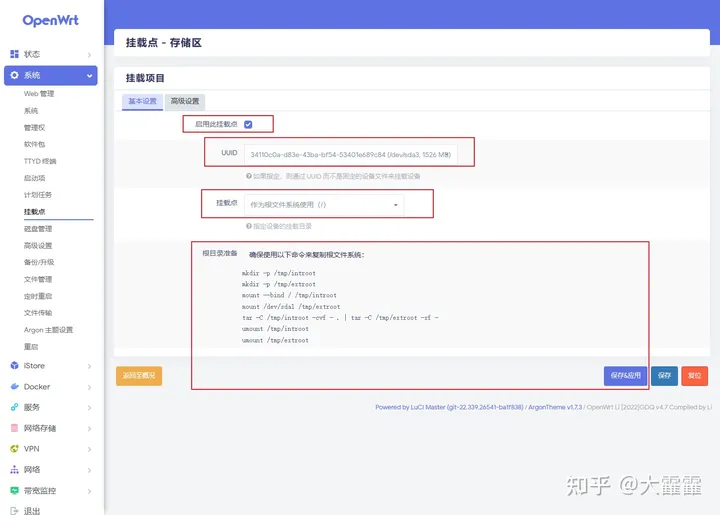
复制的命令如下,但不能直接用,需要根据实际修改(我是sda3)
根目录准备
确保使用以下命令来复制根文件系统:

mkdir -p /tmp/introot
mkdir -p /tmp/extroot
mount --bind / /tmp/introot
mount /dev/sda1 /tmp/extroot
tar -C /tmp/introot -cvf - . | tar -C /tmp/extroot -xf -
umount /tmp/introot
umount /tmp/extroot
查看现在的分区,便于一会对比:

 root@OpenWrt:~# df -h
Filesystem                Size      Used Available Use% Mounted on
/dev/root               299.0M    299.0M         0 100% /rom
tmpfs                     3.9G     17.1M      3.9G   0% /tmp
/dev/loop0              199.8M     94.4M    105.5M  47% /overlay
overlayfs:/overlay      199.8M     94.4M    105.5M  47% /
/dev/sda1                19.9M      5.8M     14.2M  29% /boot
/dev/sda1                19.9M      5.8M     14.2M  29% /boot
tmpfs                   512.0K         0    512.0K   0% /dev
cgroup                    3.9G         0      3.9G   0% /sys/fs/cgroup
overlayfs:/overlay      199.8M     94.4M    105.5M  47% /opt/docker
/dev/sda1                19.9M      5.8M     14.2M  29% /mnt/sda1
/dev/sda3                 1.4G     24.0K      1.3G   0% /mnt/sda3
root@OpenWrt:~#
本人根据自己的实际情况修改后如下:
mkdir -p /tmp/introot
mkdir -p /tmp/extroot
mount --bind / /tmp/introot
mount /dev/sda3 /tmp/extroot
tar -C /tmp/introot -cvf - . | tar -C /tmp/extroot -xf -
umount /tmp/introot
umount /tmp/extroot
把修改后的命令,按顺序逐一输入后,重启OpenWrt
命令回显太多了,只贴出后面一小部分,如下:
./www/rclone-webui-react/static/media/ws.3ea6d44f.svg
./www/rclone-webui-react/static/media/ws.405a2c5f.svg
./www/rclone-webui-react/static/media/xk.62bc9bcf.svg
./www/rclone-webui-react/static/media/xk.bd62029e.svg
./www/rclone-webui-react/static/media/ye.b5840a84.svg
./www/rclone-webui-react/static/media/ye.d13e1629.svg
./www/rclone-webui-react/static/media/yt.b6042b9c.svg
./www/rclone-webui-react/static/media/yt.f06d254d.svg
./www/rclone-webui-react/static/media/za.14e70522.svg
./www/rclone-webui-react/static/media/za.67ff2e10.svg
./www/rclone-webui-react/static/media/zm.3eef5dc0.svg
./www/rclone-webui-react/static/media/zm.a9ff495d.svg
./www/rclone-webui-react/static/media/zw.6ac3949a.svg
./www/rclone-webui-react/static/media/zw.8b885465.svg
./www/uuandriod.png
./www/uuios.png
./boot/
./.config/
./.config/rclone/
./home/
./home/ftp/
./run/
./run/docker/
./run/docker/plugins/
./run/mount/
./run/blkid/
./run/blkid/blkid.tab
./run/blkid/blkid.tab.old
root@OpenWrt:~# umount /tmp/introot
root@OpenWrt:~# umount /tmp/extroot
root@OpenWrt:~# reboot
重启后,查看分区情况
root@OpenWrt:~# df -h
Filesystem                Size      Used Available Use% Mounted on
/dev/root               299.0M    299.0M         0 100% /rom
tmpfs                     3.9G     16.8M      3.9G   0% /tmp
/dev/sda3                 1.4G      1.0G    323.0M  76% /
/dev/sda1                19.9M      5.8M     14.2M  29% /boot
/dev/sda1                19.9M      5.8M     14.2M  29% /boot
tmpfs                   512.0K         0    512.0K   0% /dev
cgroup                    3.9G         0      3.9G   0% /sys/fs/cgroup
/dev/sda3                 1.4G      1.0G    323.0M  76% /opt/docker
/dev/sda1                19.9M      5.8M     14.2M  29% /mnt/sda1
root@OpenWrt:~#
前后对比如图所示:
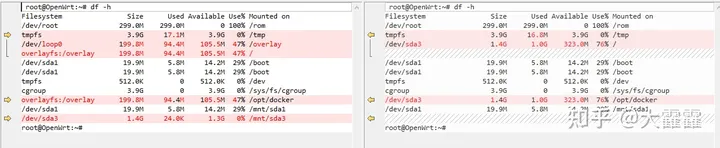
也可以在网页查看变化,如下图:
但这都是小打小闹,这点空间太小,只是出个教程记录下,下面开始把那个16G的磁盘鼓捣一下(下面那个16G的sdb)
root@OpenWrt:~# lsblk -a
NAME     MAJ:MIN RM  SIZE RO TYPE MOUNTPOINTS
loop0      7:0    0    0B  0 loop
loop1      7:1    0    0B  0 loop
loop2      7:2    0    0B  0 loop
loop3      7:3    0    0B  0 loop
loop4      7:4    0    0B  0 loop
loop5      7:5    0    0B  0 loop
loop6      7:6    0    0B  0 loop
loop7      7:7    0    0B  0 loop
sda        8:0    0    2G  0 disk
├─sda1     8:1    0   20M  0 part /mnt/sda1
│                                 /boot
│                                 /boot
├─sda2     8:2    0  500M  0 part /rom
├─sda3     8:3    0  1.5G  0 part /opt/docker
│                                 /
└─sda128 259:0    0  239K  0 part
sdb        8:16   0   16G  0 disk
nbd0      43:0    0    0B  0 disk
nbd1      43:32   0    0B  0 disk
nbd2      43:64   0    0B  0 disk
nbd3      43:96   0    0B  0 disk
nbd4      43:128  0    0B  0 disk
nbd5      43:160  0    0B  0 disk
nbd6      43:192  0    0B  0 disk
nbd7      43:224  0    0B  0 disk
nbd8      43:256  0    0B  0 disk
nbd9      43:288  0    0B  0 disk
nbd10     43:320  0    0B  0 disk
nbd11     43:352  0    0B  0 disk
nbd12     43:384  0    0B  0 disk
nbd13     43:416  0    0B  0 disk
nbd14     43:448  0    0B  0 disk
nbd15     43:480  0    0B  0 disk
root@OpenWrt:~# fdisk -l
-ash: fdisk: not found
呀,fdisk命令没有安装,容我安装一下(已安装的可以跳过)
root@OpenWrt:~# opkg update
Downloading https://mirrors.cloud.tencent.com/lede/snapshots/targets/x86/64/packages/Packages.gz
Updated list of available packages in /var/opkg-lists/openwrt_core
Downloading https://mirrors.cloud.tencent.com/lede/snapshots/targets/x86/64/packages/Packages.sig
Signature check passed.
Downloading https://mirrors.cloud.tencent.com/lede/snapshots/packages/x86_64/base/Packages.gz
Updated list of available packages in /var/opkg-lists/openwrt_base
Downloading https://mirrors.cloud.tencent.com/lede/snapshots/packages/x86_64/base/Packages.sig
Signature check passed.
Downloading https://mirrors.cloud.tencent.com/lede/snapshots/packages/x86_64/kenzo/Packages.gz
*** Failed to download the package list from https://mirrors.cloud.tencent.com/lede/snapshots/packages/x86_64/kenzo/Packages.gz

Downloading https://mirrors.cloud.tencent.com/lede/releases/18.06.9/packages/x86_64/luci/Packages.gz
Updated list of available packages in /var/opkg-lists/openwrt_luci
Downloading https://mirrors.cloud.tencent.com/lede/releases/18.06.9/packages/x86_64/luci/Packages.sig
Signature check failed.
Remove wrong Signature file.
Downloading https://mirrors.cloud.tencent.com/lede/snapshots/packages/x86_64/packages/Packages.gz
Updated list of available packages in /var/opkg-lists/openwrt_packages
Downloading https://mirrors.cloud.tencent.com/lede/snapshots/packages/x86_64/packages/Packages.sig
Signature check passed.
Downloading https://mirrors.cloud.tencent.com/lede/snapshots/packages/x86_64/routing/Packages.gz
Updated list of available packages in /var/opkg-lists/openwrt_routing
Downloading https://mirrors.cloud.tencent.com/lede/snapshots/packages/x86_64/routing/Packages.sig
Signature check passed.
Downloading https://mirrors.cloud.tencent.com/lede/snapshots/packages/x86_64/small/Packages.gz
*** Failed to download the package list from https://mirrors.cloud.tencent.com/lede/snapshots/packages/x86_64/small/Packages.gz

Downloading https://mirrors.cloud.tencent.com/lede/snapshots/packages/x86_64/telephony/Packages.gz
Updated list of available packages in /var/opkg-lists/openwrt_telephony
Downloading https://mirrors.cloud.tencent.com/lede/snapshots/packages/x86_64/telephony/Packages.sig
Signature check passed.
Collected errors:
 * opkg_download: Failed to download https://mirrors.cloud.tencent.com/lede/snapshots/packages/x86_64/kenzo/Packages.gz, wget returned 8.
 * opkg_download: Failed to download https://mirrors.cloud.tencent.com/lede/snapshots/packages/x86_64/small/Packages.gz, wget returned 8.
root@OpenWrt:~# opkg install fdisk
Installing fdisk (2.38-2) to root...
Downloading https://mirrors.cloud.tencent.com/lede/snapshots/packages/x86_64/base/fdisk_2.38-2_x86_64.ipk
Configuring fdisk.
root@OpenWrt:~# fdisk -l
Disk /dev/sdb: 16 GiB, 17179869184 bytes, 33554432 sectors
Disk model: Virtual disk
Units: sectors of 1 * 512 = 512 bytes
Sector size (logical/physical): 512 bytes / 512 bytes
I/O size (minimum/optimal): 512 bytes / 512 bytes


Disk /dev/sda: 2 GiB, 2147483648 bytes, 4194304 sectors
Disk model: Virtual disk
Units: sectors of 1 * 512 = 512 bytes
Sector size (logical/physical): 512 bytes / 512 bytes
I/O size (minimum/optimal): 512 bytes / 512 bytes
Disklabel type: gpt
Disk identifier: 09C44732-D7F8-6375-E89C-5F5DBD7BA900

Device        Start     End Sectors  Size Type
/dev/sda1       512   41471   40960   20M Linux filesystem
/dev/sda2     41472 1065471 1024000  500M Linux filesystem
/dev/sda3   1067008 4192255 3125248  1.5G Linux filesystem
/dev/sda128      34     511     478  239K BIOS boot

Partition table entries are not in disk order.
root@OpenWrt:~#
正如上面,”lsblk -a“、”fdisk -l“都告诉我,我新建的16G硬盘都叫”/dev/sdb“
root@OpenWrt:~# fdisk /dev/sdb

Welcome to fdisk (util-linux 2.38).
Changes will remain in memory only, until you decide to write them.
Be careful before using the write command.

Device does not contain a recognized partition table.
Created a new DOS disklabel with disk identifier 0x8bcce7d2.


Command (m for help): n
Partition type
   p   primary (0 primary, 0 extended, 4 free)
   e   extended (container for logical partitions)Select (default p): p
Partition number (1-4, default 1): 1First sector (2048-33554431, default 2048): 2048Last sector, +/-sectors or +/-size{K,M,G,T,P} (2048-33554431, default 33554431):

Created a new partition 1 of type 'Linux' and of size 16 GiB.

Command (m for help): w
The partition table has been altered.
Calling ioctl() to re-read partition table.
Syncing disks.
同样给他格式化为ext4
root@OpenWrt:~# mkfs.ext4 /dev/sdb
mke2fs 1.46.5 (30-Dec-2021)Found a dos partition table in /dev/sdb
Proceed anyway? (y,N) y
Discarding device blocks: done                            Creating filesystem with 4194304 4k blocks and 1048576 inodes
Filesystem UUID: 4dba9e47-33ae-4afa-9235-0c8b075aae62
Superblock backups stored on blocks:
    32768, 98304, 163840, 229376, 294912, 819200, 884736, 1605632, 2654208,
    4096000Allocating group tables: done                            Writing inode tables: done                            Creating journal (32768 blocks): doneWriting superblocks and filesystem accounting information: done   root@OpenWrt:~#
格式化完毕,可以开始创建挂载点挂载了
root@OpenWrt:~# mkdir -p /mnt/sdb
root@OpenWrt:~# mount /dev/sdb /mnt/sdb
root@OpenWrt:~# ls /mnt/sdb
lost+found
root@OpenWrt:~# cp -r /overlay/* /mnt/sdb
cp: can't stat '/overlay/*': No such file or directory
root@OpenWrt:~# cp -r /overlay/ /mnt/sdb/
root@OpenWrt:~# ls /mnt/sdb
lost+found  overlay
root@OpenWrt:~# ls /overlay/
root@OpenWrt:~# rm -rf /mnt/sdb/
lost+found/  overlay/
root@OpenWrt:~# rm -rf /mnt/sdb/overlay
root@OpenWrt:~# ls /mnt/sdb
lost+found
root@OpenWrt:~#
哦吼,忘了我的 /overlay/目录是空的,我就又删了复制的空目录了(大家别跟着学,你可能有文件,有就别删了,没文件可以忽略复制这一步)
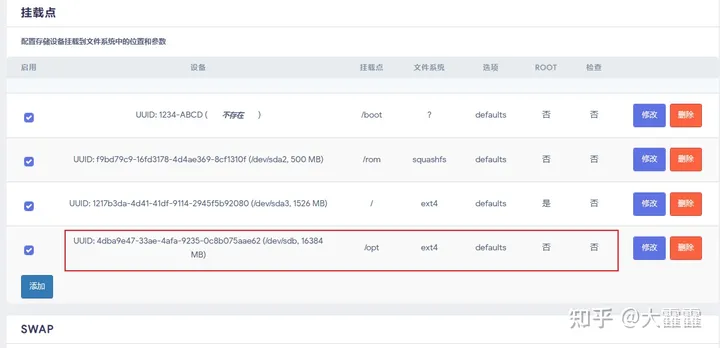
返回网页,生成配置,查看sdb,修改它
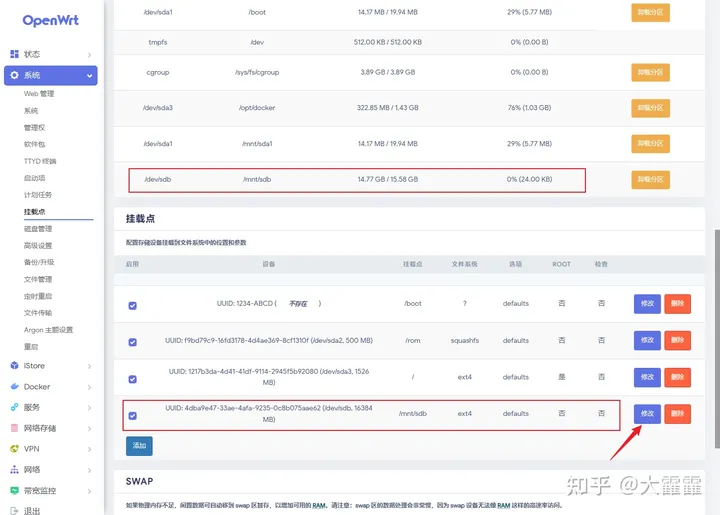
同样是启用,UUID,但这次是作为”Docker数据分区使用“
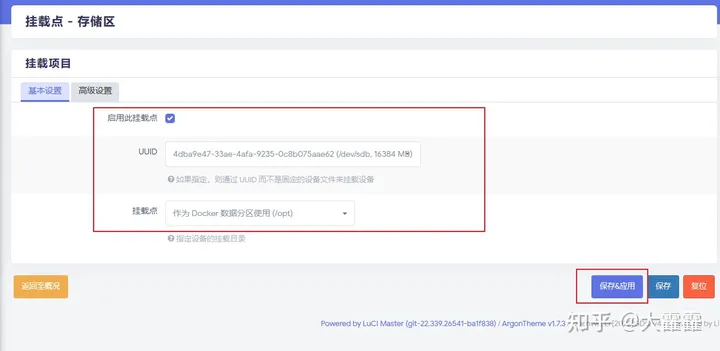
再看,如下,搞定
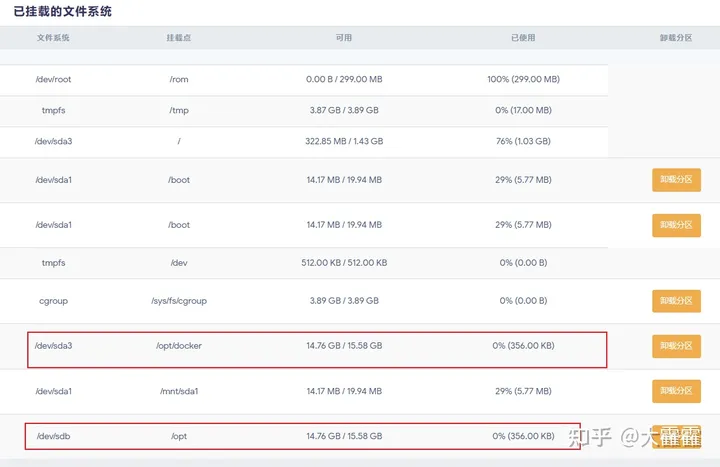
到此,扩容完成,可以开心的Docker走起了!
如果你的新硬盘重启后没有自动挂载到opt,请编辑”/etc/rc.local“文件
root@OpenWrt:~# vi /etc/rc.local

# Put your custom commands here that should be executed once# the system init finished. By default this file does nothing.mount /dev/sdb /optexit 0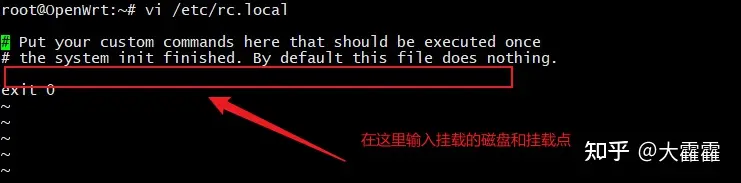
注意:如果Docker没有识别新的根目录,请重启Docker
